
Explainer Video 2: from transcribe to 3 prompts (+ full transcript)
Instructions
This guide provides a step-by-step breakdown of building a workflow in Twin AI, following the process shown in the video. Timestamps have been added to each step, allowing you to navigate directly to the relevant section in the video. Additionally, the full transcript of the explainer video is provided at the end of the article, making it easy to search for specific details using Cmd+F (Mac) or Ctrl+F (Windows).
How to Build a workflow in Twin AI
Step 1: Publish and run the workflow and view results [00:00 - 01:33]
- Click on "Publish" located in the top right-hand corner of the Twin AI app.
- After publishing, click on "Run" to initiate the workflow.
- Enable "Store this data for reuse in the future" to avoid uploading the same file repeatedly.
- Pro Tip: Storing data is highly recommended as it allows you to test your workflow multiple times with minimal errors.
- If the workflow fails, click on "Edit" to modify the workflow.
- Delete and editing any unnecessary blocks by selecting the block and clicking "Delete."
- Common Mistake: Accidentally clicking "Delete" without entering edit mode.
- Check results by navigating to the "Results" section.
- Initially, no runs may be found if outputs are not connected to the workflow's "General settings". Click on the background of the workflow or navigate to "General settings", and select the last block as output.
- Navigate to the "Transcribe" block to view the output.
- Ensure that the output of the workflow is properly connected to the last workflow blocks in the general "Workflow settings".
Step 2: Create prompt blocks for each chapter [01:33 - 03:40]
- The Personal Development Plan consists of three chapters:
- Talents
- Growth Potential
- Growth Suggestions
- Add three separate prompt blocks for each chapter:
- Click the "+" button or navigate to "AI" and select "Prompt."
- Alternatively, type "search prompt" in the search bar.
- Drag and connect each prompt block to maintain workflow continuity.
- Rename each prompt block for clarity:
- Talents Prompt
- Growth Potential Prompt
- Growth Suggestions Prompt
- Select each prompt block and click on "Input."
- Choose the appropriate model from the dropdown menu:
- Talents Prompt: Select "o3 Mini" (the latest model - for now). This is the most important chapter, that's why we're picking the newest AI-model.
- Growth Potential Prompt: Select "ChatGPT4o."
- Growth Suggestions Prompt: Select "ChatGPT4o."
Step 3: Add and save prompts [03:41 - 04:32]
- Prepare your prompts and put them in the prompt-field.
- Edit your prompt where needed. This where you can iterate.
- Click on "Save" to store your configurations.
Step 4: Connect data sources and configure prompts [04:33 - 7:27]
- Connect the "Transcribe" block to each prompt block:
- Click on "Connect Data Source."
- Select "Block Output from Transcribe."
- Add settings items for each prompt:
- Navigate to the specific prompt block (e.g., Talents Block).
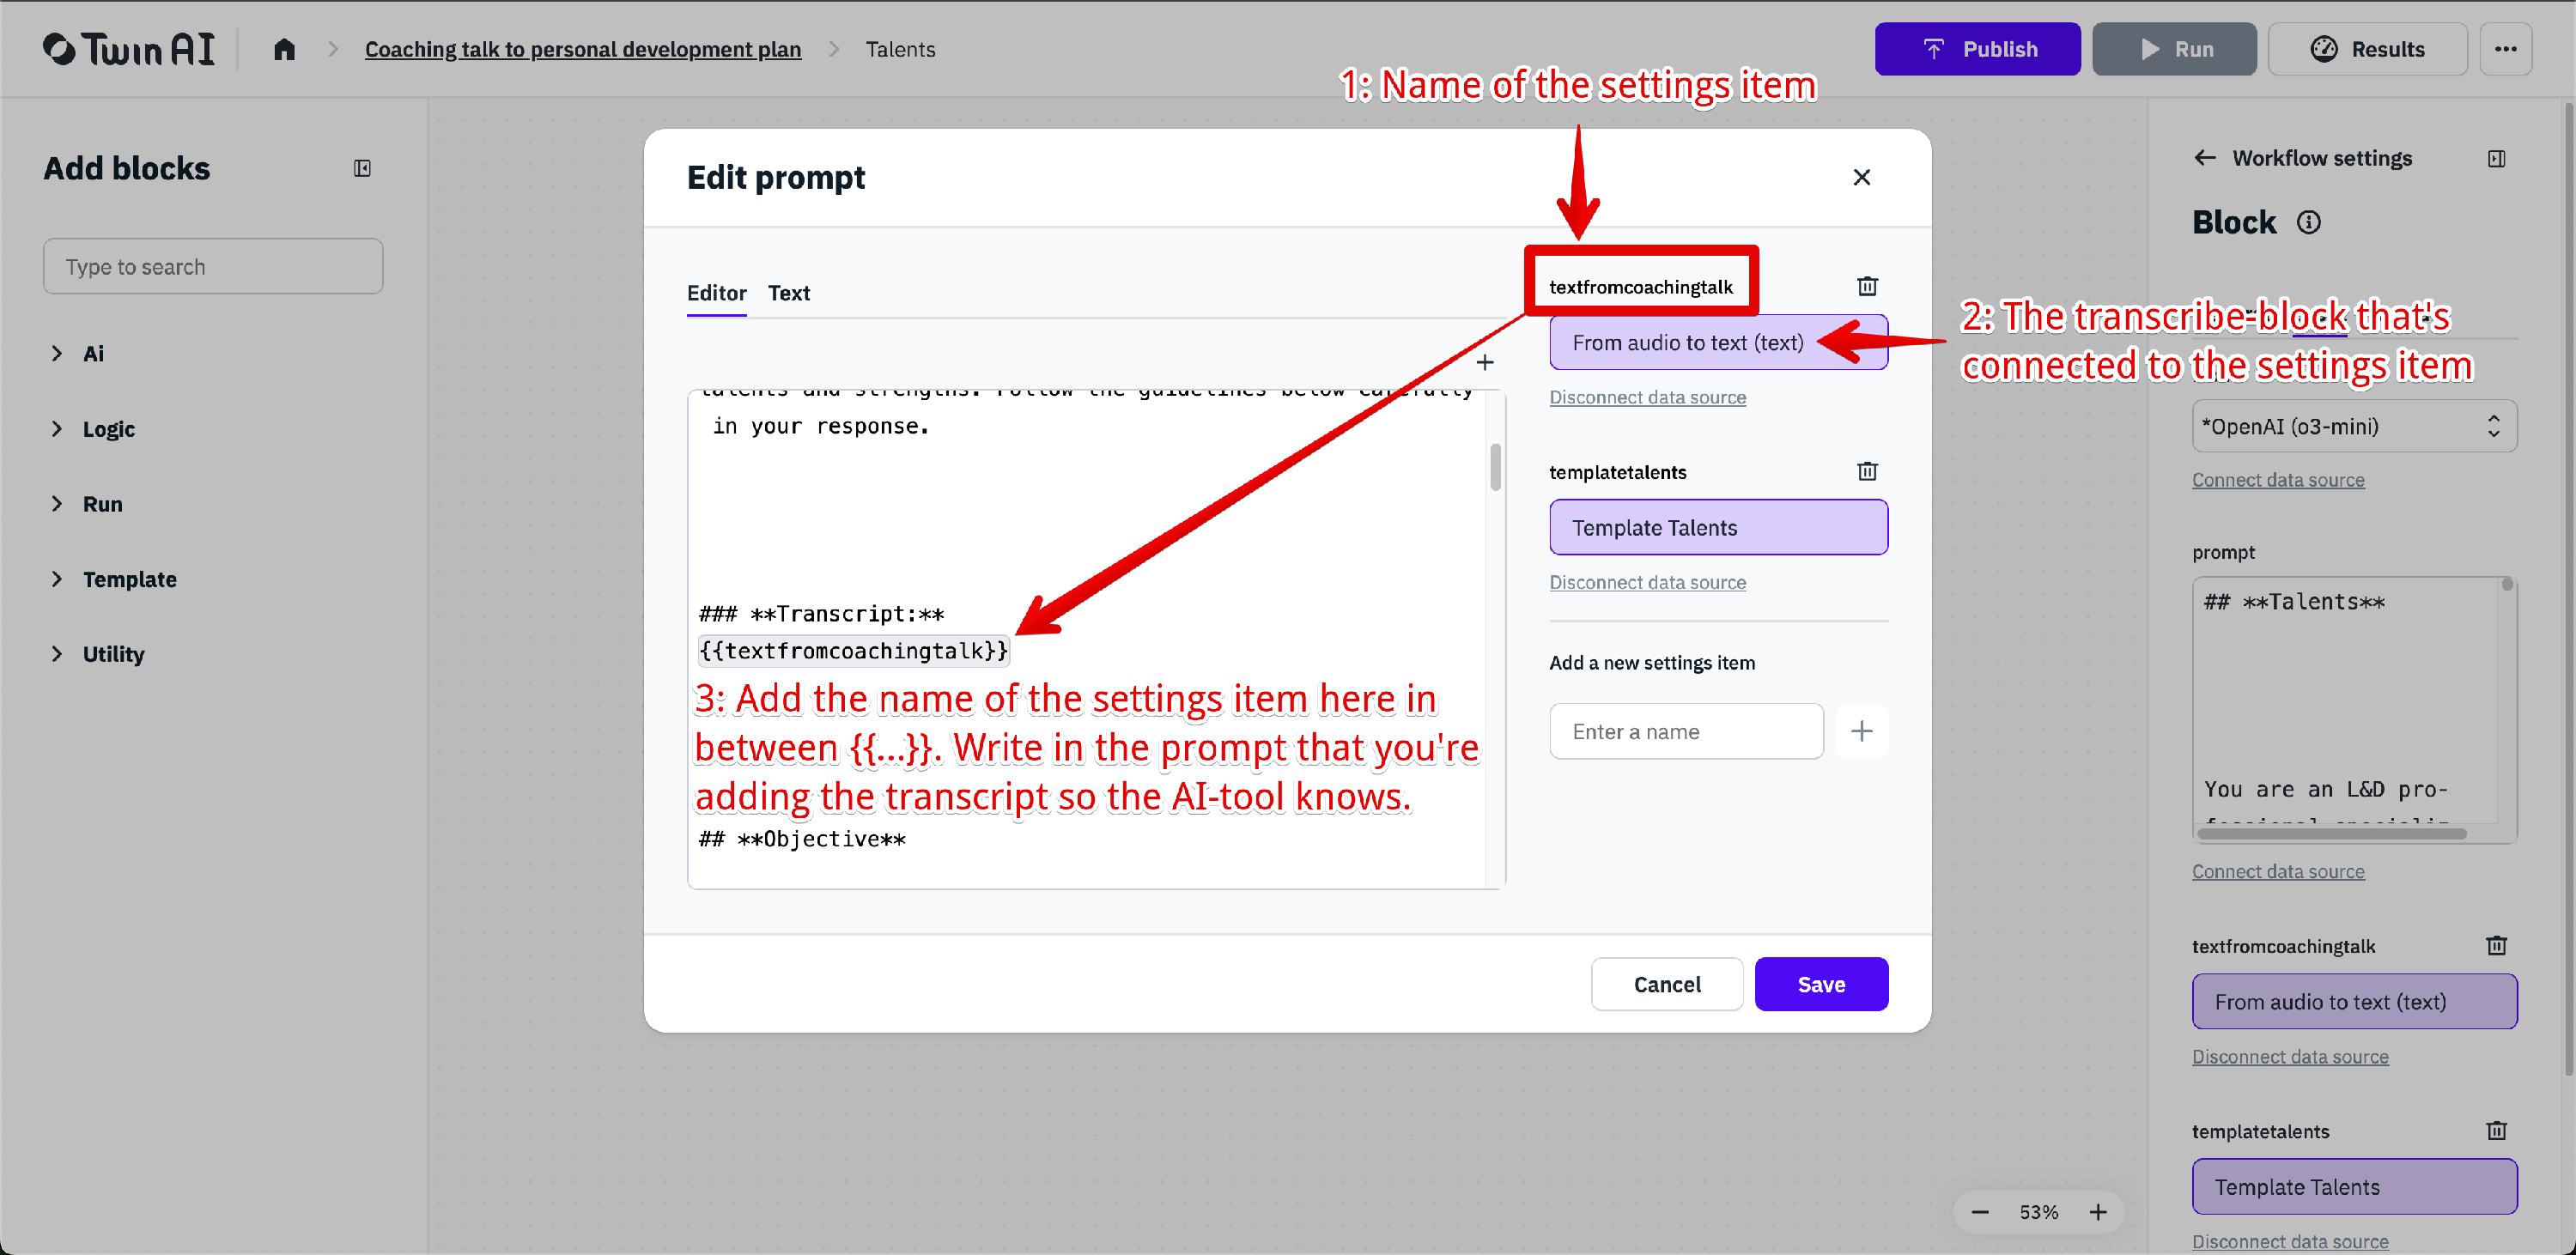
- Scroll down and add a new settings item such as "Text from Coaching Talk."
- Connect the data source as previously done.
- Embed variables in prompts:
- Open the prompt block.
- Insert variables by enclosing them in double bracket, e.g., {{variable}}. See screenshot below.
- Save your changes.
Step 5: Run the workflow and review costs [7:28 - 08:41]
- Navigate to "Block general settings." Do this by clicking on one block of your workflow.
- Click on "Run Block."
- Check if the AI-model and your prompt have been filled in.
- Click on "Run Now" to execute the workflow.
- Monitor the results:
- Click on one specific block, go to the block "Output" and click on the output underneath or "View block results".
- Click on the Twin AI logo to view the costs. Check the costs incurred.
- Estimate total workflow cost (e.g., approximately €0.10).
Final Tips
- Consistency is key: Always name your prompt blocks clearly to ensure easy selection and management later.
- Experiment with models: Try different AI models to find the one that best suits your workflow needs.
- Monitor costs: Regularly review the costs associated with running your workflows to optimize efficiency.
Full transcript
Running the Workflow
So in the meantime, I've gone ahead. On the right hand side in the top corner over here, I clicked on Publish and then I clicked on Run. I added a Coaching talk which is just a template. This is probably the last time I'm going to say this, but this is all fictional data. Another pro tip, if you click on "store this data for reuse in the future", you don't have to upload the same file every single time. Again, I strongly recommend doing this because you are going to test your workflow a lot of times just to make sure there aren't or there are the least amount of errors in there.
So when you click on templates, Coaching Talk or Workshop, when you click on Run now, it's actually going to start running. I can go back and the workflow will just continue running. It might fail because this block is still in there. I'm going to delete this block. Need to click on edit first. I make this mistake a lot of times. Click on delete and in the meantime I can check if the results are already there.
Results. There are no runs found because we didn't connect any outputs to the workflows over here. But here you can see that we do have some results. So input this, the output. It's nice. It's working. Now we know that we have the transcribe from this block. You can see the output. It's over here.
Adding Prompts for Personal Development Plan
Like I said, the personal development plan contains three different chapters. So we're going to add three different prompt blocks. There are several ways that you can do this:
- You can click on the plus over here
- You can go to AI over here, select the right one and click and drag
- You can type to search "prompt" over here
So prompt, I'm just going to click and drag it. I can click on the plus, scroll down, select prompt as well. And then you can see it's automatically connected with each other.
So I'm just going to go ahead and do that one more time because I know we're going to have three different chapters. Prompt, go there. Connecting them is as easy as clicking and dragging.
So the first chapter of our personal development plan is about talents. The second chapter is where the potential is to grow and the third chapter is how you can grow. So I've renamed all three prompts just for clarity. Like I already said before, give clear names to the blocks so it's clear what you're selecting later.
Selecting Models for Prompts
I can click on inputs over here and just like with the transcribe block, I can select which model I want to use. Going to say one more time, experiment with using different models. We have loads of them as you can see if the dropdown is loading. And for the Talents prompt, I'm going to go with O3 mini because that's the most recent model that has been launched. Like I already said, we try to implement all new models within two weeks and the talents prompt is the most important. So I'm going to use the newest model for this.
There's a prompt which I obviously prepared already. So I'm going to go to another screen which you cannot see and copy the prompt. All right, I'm going to paste it in here and you can see the criteria for this chapter. I can scroll down. You can see it's just some basic prompting. More about it later. I can click on save and I'm going to do the same for growth potential.
I'm going to pause this video, add the other prompts and see you in a bit.
Connecting Transcribe Output to Prompts
So there I am again. I added the prompts for growth potential and growth suggestions as well. Like I said, it's just criteria for this particular chapter. When I Click on Talents, O3 mini, click on Growth Potential, ChatGPT4, and here as well.
So we have to connect the transcribe, so the audio to text, to this prompt as well. First step that we have to take is by clicking from one plus to the other so we get the line over here.
The second way that we have to do that is by adding a new settings item over here. So you just go to the block, the talents block we're currently in. Scroll down and add a new settings item. So we're going to have the text from the Coaching talk. So "text from Coaching Talk". I can add the... Ah, pro leads to long. Oh, there it is. I can click enter or the plus and it shows here. We need to connect this block to this. So I'm going to click on "connect data source" and instead of being able to select just one, I can select a second one. Now from audio to text, it's the block output from the transcribe prompt. Block output, connect.
Same with growth potential. Like I said, I love clarity. So I'm going to copy this, add a new settings item for growth potential as well. Paste it, Connect data source. It's from audio to text. Same with growth suggestions. Scroll down "text from Coaching Talk". Connect data source, block output from the transcribe block. Click on connect. There it is.
Third thing that you have to do next to Connecting the lines and adding it as a settings item is added to the prompt because you want your AI model to know that it needs to use this input.
So in the prompt I already mentioned it "add the transcript here". How do you do that? By opening with two brackets, copying this again, paste it there and closing it off with two brackets as well. Copy it. Save. Same with growth potential. Open the prompt block, scroll down a bit because I know that's where it is. Add the transcript here and you can see "text from Coaching Talk". Save, Grow Suggestions. Open the prompt block and add the transcript here. Oh, there it is. Click on save.
Running the Workflow and Cost Estimation
So just in the power of repetition, when you are building this workflow, you should connect the transcribe in three different ways:
- Add it to the prompt like we just did
- Add it as a settings item like we just did over here
- Connect the lines with each other
So now I'm going to show you partly how expensive it is to run a part of this workflow. So I'm going to go back general on this workflow general and I can click on Run block. I will do that. Now I have to select a model. It's O3 mini. By the way, this is being fixed by our developers as we speak because I already selected the model beforehand.
Click on run now and you can see that I selected OpenAI O3 mini. From audio to text. This is the prompt that I've added and the results will be visible in just a bit. I will go back to the twin AI logo over here and you can see we just spent €0.03 by getting the transcribe and the talents block. So it's only €0.03.
So I'm just going to make a quick estimate. I think the whole workflow is going to be €0.10 maximum. Compare that to the two to three hours that I usually should work to get the audio file to a personal development plan and you can see it's just a quick win.